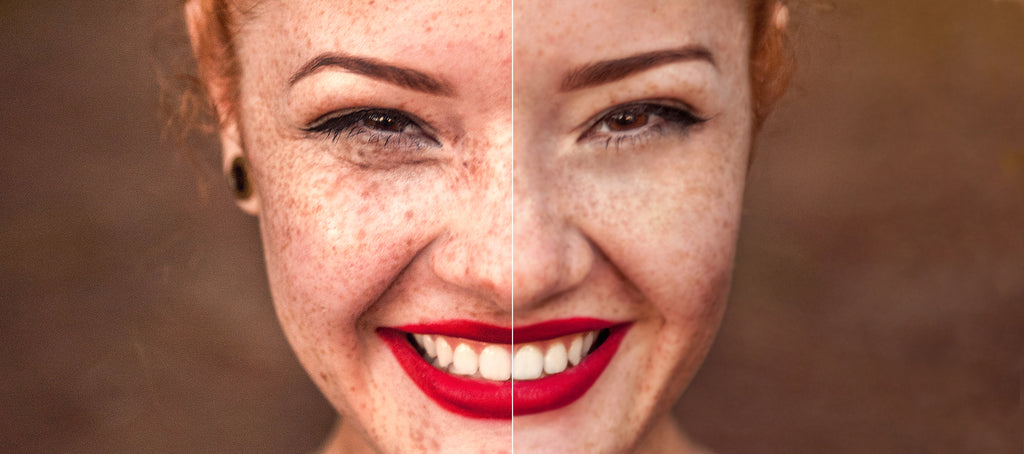
One of Photoshop's most common uses is to retouch a model's face or skin in a photo. However, retouching skin without causing a face to look fake or "plasticky" is no easy feat.
Receive free ecommerce & product photography tips
In the following Photoshop CC 2019 skin retouching tutorial, we'll go over several steps you can apply to any face to smooth wrinkles and pores, remove blemishes, redness, and stray hairs, and contour a face to appear thinner. Learn to make subtle changes so you can retouch skin in Photoshop while retaining the model's unique characteristics.
How to fix blemishes in Photoshop
You can remove redness around the nose/eyes and unintentional ruddy cheeks quickly and easily from a model's face without affecting other red areas in your photo, like lipstick or clothing. Because this step affects areas throughout your image, you'll want to do this step before you retouch any other areas of your image.
Step 1: Set up your layers
In your Layers panel, duplicate your Background layer and rename it to "redness correction."
To duplicate a layer, right-click (CTRL+Click on a Mac) on your layer and select Duplicate Layer, or click on the Layer panel menu and select Duplicate Layer.
Step 2: Select color range
In the dropdown menu at the top of the application window, choose Select > Color Range.
In the dialog box that appears, make sure the radio button next to Selection is chosen at the bottom of the box, and select the eyedropper tool on the right-hand side of the dialog box. Click on an area of redness on the face within the image itself (you may need to move the dialog box out of the way to get to the image). Usually, the tip of the nose is a great place to start.
Choose the eyedropper tool with the + symbol to add to the selection, clicking on parts of the face that also need attention — this might be the areas around the eyes or tip of the chin. Move the fuzziness slider toward the left if the selection area looks too large.

Click OK.
Step 3: Feather the selection
Choose Select > Modify > Feather from the dropdown menu and set your feather radius to a low number, such as 5 pixels.

Step 4: Adjust hue of selection
Choose Image > Adjust > Hue/Saturation (or click CTRL+U on a PC, COMMAND+U on a Mac) from the dropdown menu and move the Hue slider to the right until the redness is reduced, but the change remains subtle. Here, we moved the slider just to +5; your number will most likely be between +2 and +8.

Leave the Saturation and Lightness sliders at 0.
Click OK.
How to smooth skin and edges in Photoshop
The next step in the skin retouching Photoshop tutorial is to remove blemishes, smooth out stray hairs, and soften wrinkles.
Remember, when doing Photoshop face retouching, the ultimate goal is to keep the model looking realistic, so we don't want to eliminate ALL wrinkles. We also want need to keep all of the face's features in place; freckles and dimples, for instance, need to stay where they are.
This stage in the process is by far the most time-consuming, and will require your artistic eye. It's also the easiest step to mess up, so we'll keep all of our adjustments in a separate layer that you can erase or paint over without affecting your Redness Correction layer.
For this step, we'll be using a combination of the Clone Stamp tool and the Healing Brush tool. Both of these tools work by selecting an area of the image that you want to create a selection from, and then "painting" over the blemish, wrinkle, or stray hair with the selected portion of the image.
Step 1: Create a new layer
Create an empty layer above your Redness Correction layer and name it "spot correction."
Step 2: Fix the big stuff
Start big and work your way in.
First, select the Clone Stamp tool from the Toolbar and set your hardness to 30% or lower. Set the opacity to between 40% and 50%, and make sure the sample is set to Current & Below.

To use the Clone Stamp tool (and the Healing Brush tool), find an area of the image you want to correct, and then move your cursor to a nearby area that's the same color but smooth in texture.
Hold down the ALT key (OPTION on a Mac). The cursor will change shape. With the ALT (OPTION) key still pressed, click on the image. Release the ALT (OPTION) key and "paint" with the tool on the area you want to correct.

As you use the Clone Stamp tool (and the Healing Brush tool), remember to choose selections that are very close to the area you're trying to fix, to ensure smoothness (and believability) with your colors and textures.

Work on smoothing out stray hairs and flyaways around the head first. As you work, remember to keep the hair looking natural; the last thing you want is for the head of hair to start looking like a helmet.
Next, move to the face, and carefully use the Clone Stamp tool to remove any pimples and stray hairs, and fix makeup if necessary. As you work, you can change the size of your brush as needed, depending on the area you are working on.

Step 3: Smooth out fine lines and details
Finally, choose the Healing Brush tool and work on any wrinkles. Begin at the far edges of wrinkles and work your way in, using a very soft Healing Brush and trying not to remove wrinkles completely.

When you zoom out and view your image as a whole, you may not notice all the individual changes you made at once. In the end, they'll add up to enhance the overall appearance.

How to refine lines in Photoshop
The next stage of the skin retouching process is the easiest and quickest, and involves some fancy layer treatments.
Step 1: Prepare your layers
You'll need to stamp the redness correction layer and the spot correction layer into a new layer while retaining our original background layer.
Select the two correction layers and stamp them by typing CTRL+A+E (COMMAND+OPTION+E on a Mac).
Duplicate the new stamped layer two times. Name the lower duplicated layer Blur and the upper duplicated layer Texture.

Click the eye icon next to the Texture layer to make that layer invisible. Select the Blur layer.
Step 2: Apply blur
Choose Filter > Blur > Gaussian Blur from the dropdown menu.
In the dialog box, adjust the blur until you can no longer see any of the model's pores. This will usually be between 1.0 and 3.5, depending on the clarity and resolution of your image.

Click OK.
Step 3: Apply texture
Click on the eye icon next to the Texture layer to make the layer visible again. Select the Texture layer.
Choose Image > Apply Image from the dropdown menu.
In the dialog box, set your Layer to Blur, Channel to RGB, Blending to Add, Opacity to 100%, and Scale to 2. Also, check the box next to Invert. You should still be in the Texture layer when you do all of this. The Texture layer will become gray with hints of details.

Click OK.
Finally, adjust the blend mode of your Texture layer to Linear Light.
Step 4: Mask out details
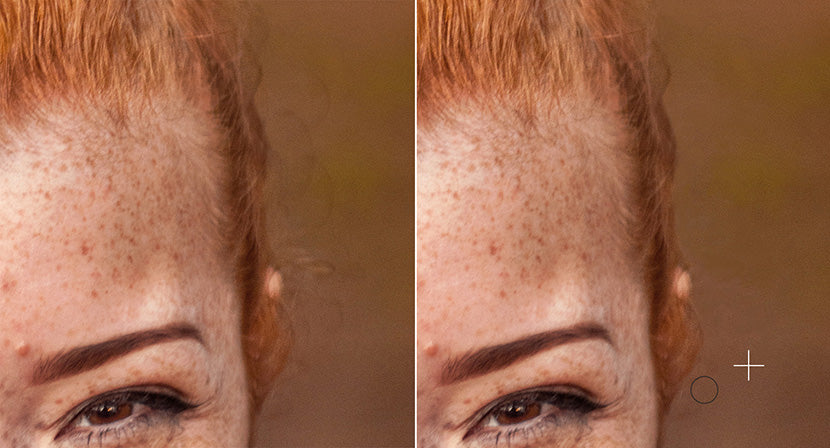
You should still be in the Texture layer at this point. While holding the ALT key (OPT on a Mac), click on the mask icon at the bottom of the Layers panel. This will create a mask with the entire image masked out.

Make sure your mask is selected (you should see a partial white outline around the mask icon within the layer, as in the image above).
In your Toolbar, set your foreground color to white and your background color to black.
Choose your Brush tool from the Toolbar and adjust its settings so that it is very soft (30% hardness or lower), and its opacity is around 40%.
"Paint" in the areas of your image where you want to bring back in details, such as around the eyes, eyebrows, lips, teeth, edges of the nose, and everything around the face, including hair, clothes, and background.

Step 5: Make any adjustments to Blur layer
At this stage, you'll be able to see if there are any areas of the model's skin that still need adjustments after spot correction and blurring. You can use the same tools and techniques you used in the Spot Correction layer to fine tune the Blur layer.
How to make faces thinner (or wider) in Photoshop
The next and last step in this skin retouching Photoshop tutorial will allow you to add or remove shadows and highlights. Strategically adding shadows allows you to make the face, or specific features, appear thinner. Adding highlights can help define certain parts of the face such as cheekbones and the area just below the eyebrow.
You can also remove existing shadows and highlights to soften the skin further and fix small lighting issues. Both adding and removing shading are done the same way, at the same time.
Step 1: Set up your new layer
Create a new, empty layer above your Texture layer. Name the layer "contouring."
Fill the contouring layer with 50% gray by choosing Edit > Fill from the dropdown menu, or by typing SHIFT+F5 (FN+SHIFT+F5 on a Mac) and choosing 50% Gray next to Contents.

Click OK.
Change the Contouring layer's blend mode to Soft Light.
Step 2: Darken specific areas
Select your Burn tool from the Toolbar. Set the tool's settings to 40% opacity, and make sure the Range is set to Midtones. Adjust the size of the brush to something rather large.
Using the Burn tool within the contouring layer, "paint" the sides of the face and the edge of the chin to slim the face. If you want to contour the nose as well, paint the sides of the nose, starting in the middle of the bridge and working down to the lower edges.
Set the Burn tool to a lower opacity to "paint" over areas of the face that are too bright, such as highlights that need to be brought down in brightness.
Step 3: Lighten specific areas
Select the Dodge tool from the Toolbar. As with the Burn tool, you'll want to set the Dodge tool to about 40% opacity and make sure the Range is set to Midtones.
Use this tool to paint the tops of cheekbones and the middle of the nose. You can also brighten the areas just below eyebrows, and the middle of the forehead if it is not too bright already.
As with the Burn tool, you can also use the Dodge tool to brighten areas of the face that are in deep shadow to soften the overall effect.

Your final image
Place all the layers you created into a new layer group so you can keep them together, separated from the original Background layer. You can now compare your changes to the original image by toggling the visibility of the new layer group.

Professionally edited images are important to making a great impression to online users. Looking to learn more? We've created an entire library of Photoshop retouching tutorials and more guides to help you learn how to DIY your photo editing.