

Photoshop’s Magic Wand Tool: You’ve definitely heard of it and, depending on how much you use Photoshop in your day-to-day, you may have even used it.
Learn what the Magic Wand Tool is and how to select and mask in Photoshop with it. This Photoshop masking tutorial will turn you into a pro in no time.
What is the Magic Wand Tool?
The Photoshop Magic Wand Tool is a quick and easy way to select and mask certain portions of an image, giving you the ability to alter one part of your image while leaving other parts intact. One of the most common uses of this tool is to swap out or remove the background of a product photo, leaving the subject of the image in place.
The Magic Wand Tool works by selecting an area of solid color within an image. Once your selection is made, the Magic Wand Tool gives you multiple options for refining that selection.
What is the Magic Wand Tool used for?
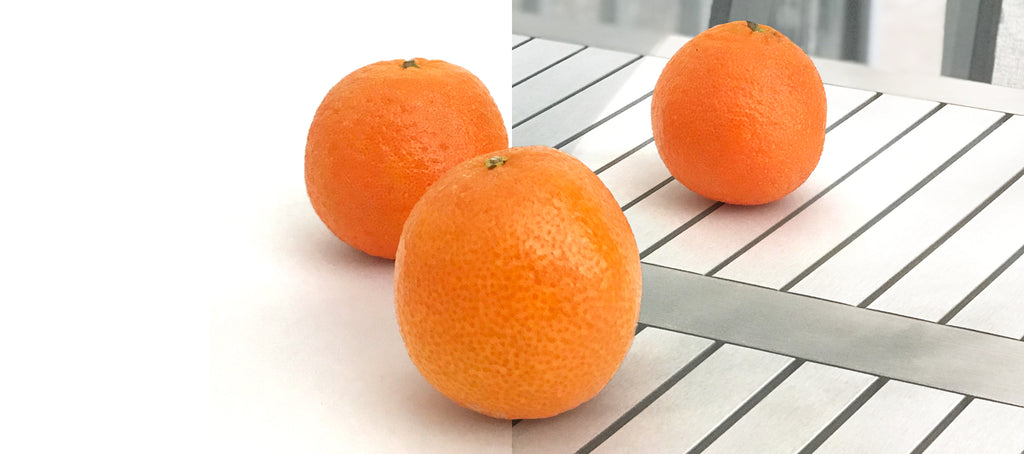
The Magic Wand Tool is a go-to tool when you want to display a product in various settings by showing it against different backgrounds, or when you want to remove a background altogether so your product stands on its own.
This is often the case for marketplaces like Amazon or eBay, which have product photo requirements of their own that outline the approved backgrounds your images can have.
How to select and mask in Photoshop with the Magic Wand Tool
- Open your product photo and duplicate the background layer
- Hide the background layer
- Configure the Photoshop Magic Wand Tool
- Make your selection
- Refine the edges of the selection
- Insert a new background into your image
Step 1: Open your product photo and duplicate the background layer
In Photoshop CC18, open the file containing the image you will be modifying.

With your image open in Photoshop CC18, open the Layers palette by going to Window > Layers. Make sure the Background layer is highlighted. Duplicate the Background layer by clicking Layer > Duplicate Layer.
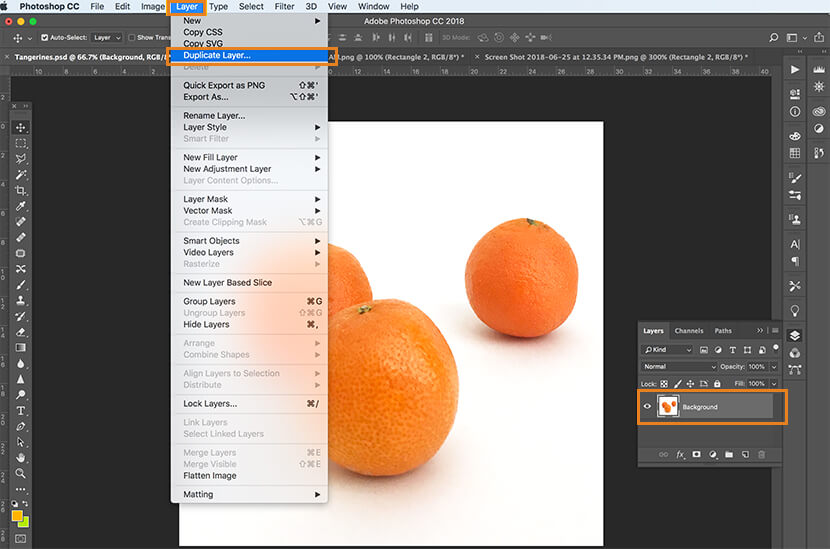
You will be given the option to give your duplicated layer a custom name. Giving your layer a name that indicates the background has been removed (such as “isolated”) will make your file easier to use for others on your team who may need to access it in the future.

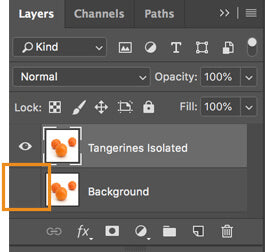
Step 2: Hide the background layer
In your Layers palette, click on the eye icon just to the left of the image thumbnail. This way, your original background won’t be visible and distracting as you start to modify your duplicated layer.
Step 3: Configure the Photoshop Magic Wand Tool
Choose the Magic Wand Tool in the Tools palette to the left of your screen, or type “W.” If the Magic Wand Tool isn’t visible, it may be hidden behind the Quick Selection Tool. In this case, click and hold on the Quick Selection Tool, and choose the Magic Wand Tool.

Once you have the Magic Wand Tool selected, you can adjust several parameters within the tool to control how much or how little is selected at a time.
At the top of your screen, you’ll see the options for adjusting how the Magic Wand Tool works.

- Single Selection: This is the option you want selected when you first use the Magic Wand Tool
- Add To Selection: This you will access automatically when you hold down SHIFT while using the Magic Wand Tool
- Subtract from Selection: This allows you to remove pixels from your selection when clicking on an area of your selection
- Intersect with Selection: This creates a new selection that only includes pixels from a previous selection
- Sample Size: In newer versions of Photoshop, you have the option to adjust your sample size. By default, the Magic Wand Tool is set to select only one pixel’s color at a time. Increasing the sample size means the Magic Wand Tool is averaging the colors of the pixels around the sample into its selection criteria. In our example, the Sample Size has been left at Point Sample.
- Tolerance: You can adjust the Magic Wand Tool’s Tolerance to select a larger area at a time. Generally, you’ll want to set your tolerance somewhere between 15 and 30. In this example, the Tolerance is set to 20.
Step 4: Make your selection
There are two ways to use the Magic Wand Tool to select the subject of an image: select the background and select the subject. The method you use will depend on whether or not the background of your image is mostly one color.
Method 1: Select the background
If the background of an image is a solid color or almost a solid color, you can use the Magic Wand Tool to select the background, and then inverse the selection.
- Make sure you’re in the duplicated layer (it should be highlighted in the Layers palette).
- Click anywhere within the background with the Magic Wand Tool.
- While holding the SHIFT key, click on areas of the background that weren’t included in the initial selection, such as the shadows under the oranges in the example.
- Select inverse by clicking SHIFT+CTRL+I (SHIFT+COMMAND+I on a Mac) to create a selection of just the subject.

Method 2: Select the subject
If your background is multiple colors, you can select the subject of your image instead of the background.
Photoshop CC18 has an option called Select Subject. This intuitive feature figures out and selects the subject of your photo, no matter how complex it is.

Here’s how to use Select Subject to remove the background:
- Make sure you’re in your duplicated layer (it should be highlighted in the Layers palette).
- Select the Magic Wand Tool, but do not click anywhere on your image.
- Choose the Select Subject button at the top of the application. You should now have a rough selection of the subject.
- Click on Subtract from Selection at the top of the screen. Then, click on any areas of the selection that don’t belong to the subject (such as the shadows under these tangerines). This will remove these areas from the selection.
If you are using an older version of Photoshop, you can still use the Magic Wand Tool to select your subject if your background is complex but the subject is mostly one color. You would follow the same steps in Method 1 to select the subject. The only difference is that you won’t select the inverse once you’ve finalized your selection.
Step 5: Refine the edges of the selection
At the top of the application window, next to the Select Subject button, you will see a button called Select and Mask… Click on this button.
(If you’re using an older version of Photoshop, you may need to get to this function by going to Select > Refine Edge.)

Your window will be replaced by a screen that has a series of global controls on the right and spot-adjustment tools on the left.
At the top of this screen to the right, just under the Properties tab, you’ll see a button marked View. Click this and make sure On Layers (Y) is selected. You now can see your subject isolated without any background at all.

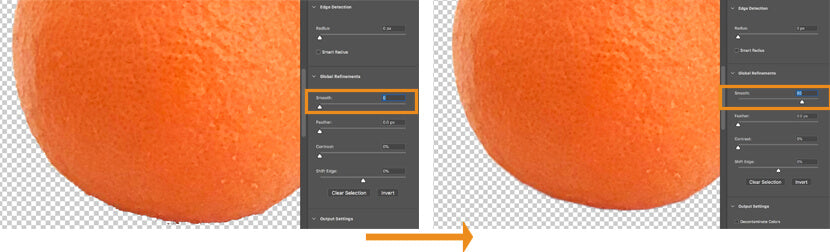
You have quite a few features you can play with here, but the most useful when you’re trying to isolate a product image are the Smooth function under Global Refinements, and the Refine Edge Brush Tool to the left of the screen.
Dragging the Smooth slider to the right will smooth out any rough edges on your selection.
The Refine Edge Brush Tool (accessed by clicking “R”) will allow you to spot select certain areas of your image. To use, click on the tool and paint over areas of your selection that still need refinement.

Once you are satisfied with your selection, click on Output Settings in the lower right-hand side of your screen and choose Output to: Layer Mask. Click OK.

You now have your subject completely isolated from its background using a layer mask.

Step 6: Insert a new background into your image
Open the file containing the new background you want to show behind your product.
In the file containing your new background, select the entire image by clicking CTRL+A (COMMAND+A on a Mac). Copy the selection by clicking CTRL+C (COMMAND+C on a Mac).
Go back into the file containing the subject you just isolated. Select the unaltered Background layer. Then, click CTRL+V (COMMAND+V on a Mac) to paste the new background into the file.
The new background should appear as a new layer between your masked subject and original background. You can toggle the original background layer back to visible now.

If your original image was taken against a white background, you can set your new background layer blend mode to Multiply to pull the original shadows back into the new image.
You can add more layers for additional backgrounds, and toggle the eye icon next to each to see how they look with your subject.
You can also create layers and fill them with solid colors (including white) to show your subject against a solid background.

Not happy with the shadows in your shot? You can learn how to add a natural shadow in Photoshop to fix them in post-processing.
When to Use the Magic Wand Tool for Your Product Photos
Learning how to select and mask in Photoshop with the Magic Wand Tool is helpful for commercial photographers and ecommerce sellers, because it’s a technique that you can apply to your product photos. Here are a just a few scenarios where it comes in handy:
- Show your product in various environments. Help your customers connect with your product emotionally by seeing it in a beautiful or familiar setting when changing the background. This can also help you prepare the image for different target segments, so you can swap out backgrounds that make more sense for your audience.
- Select your product so you adjust its size or color without altering the setting in which it has been photographed. This means you can show different color variants for your product without having to take multiple photos.
- Remove the background from a product photo so your product stands out on its own.
- Create a white background image so that you can list your products on third-party marketplaces, like Amazon or eBay.


![How to Create a Clipping Path in Photoshop [Updated for 2022]](http://pathedits.com/cdn/shop/articles/image14.jpg?v=1639448433 "How to Create a Clipping Path in Photoshop [Updated for 2022]")


