Realistic shadows around objects make product photographs look professional and believable. However, you may not have the ability to create photographs in the right settings, or with the correct lighting to achieve the shadows you need.
With patience and finesse, you can add natural-looking drop shadows in Photoshop to your product photos. This photo editing process takes time, skill, and an understanding of how shadows work.
To learn how to add a shadow in Photoshop to your product photos, watch the video below—and then scroll down to follow along via written tutorial.
How shadows work
Before you begin to draw or create your shadow in Photoshop, it’s helpful to understand how shadows work. Objects have two types of shadows:
- Cast shadows are shadows around an object that appear on the floor or on other objects around the object.
- Form shadows are shadows that appear within the object itself.

Both types of shadows are determined by the direction of, distance from, and number of light sources. You can use form shadows on your object to see how a realistic cast shadow might appear. Cast shadows become lighter and blurrier as they get further from the object.
In this Photoshop tutorial, you’ll learn how to add a natural shadow in Photoshop using a combination of the Drop Shadow Layer Style, transform tools, the gradient tool, blurs, layer masks, and alpha channels.
The difference between a drop shadow and a cast shadow
Creating a realistic shadow is a much more complicated and rewarding process than just applying a drop shadow to an object. Drop shadows by themselves are roughly the same size and dimension as the object. Rarely in real life would you encounter a shadow that looks just like an unmodified drop shadow. Adjusting your shadow into a three-dimensional cast shadow using the method described in this tutorial is essential to making your shadow look natural.
Tutorial: How to add a natural shadow in Photoshop
- Isolate your object from the background
- Create a new background behind your isolated object
- Determine your cast shadow color
- Create a drop shadow
- Create a layer from your drop shadow
- Distort the drop shadow
- Create an alpha channel
- Create a gradient within your alpha channel
- Blur selection
- Create a layer mask
-
Consider light source and clean up shadows
1. Isolate your product from the background
Open the photo you plan to modify. Once you’re in the new file, open your Layers panel by going to Window > Layers. Select the object in your photo.

Copy your selection and paste it into a new layer. Doing this will allow you to work with your product image without destroying the original photo.
Give your new layer a name that indicates the background has been removed (or “isolated”) to avoid confusion with other layers as you create your shadows.
Click on the eye icon next to your Background layer to make the background invisible. This way, you’ll only be able to see your object against a transparent background.

2. Create a new background behind your product
In your Layers panel, select your hidden background layer. Go to Layer > New Fill Layer > Solid Color…. A dialog box will appear asking you to name the new layer. Let’s call it “solid white.”

Click OK.
Now the Color Picker window will appear on your screen. Move your cursor all the way to the upper left-hand corner of the color field to select white. Or, in the hexadecimal color value at the bottom of the dialog box (next to the # symbol), type “ffffff.” This will give you a pure white color.

Click OK.
You should have a layer of white covering your entire image.
In your Layers panel, grab your new white Fill layer and drag it underneath your “isolated” layer.

3. Determine your cast shadow color
Shadows have color, and you can look at form shadows on your object to determine what the color of your cast shadow should be.
Find a form shadow within your object, and use your Eyedropper Tool to select that shadow.

The selected color will appear as your foreground color at the bottom of your Toolbar. Double click on the new foreground color to bring up the Color Picker adjustment dialog box.

Adjust your selected color to be a bit darker and less saturated by moving the selection down and to the left of the color field. Click OK.
4. Create a drop shadow
With your isolated object layer selected, click on the fx button at the bottom of your layers panel and select Drop Shadow.

The Drop Shadow dialog box will pop up. Create a drop shadow by setting your shadow color to your foreground color. Don’t worry about the opacity, distance, spread, and size levels yet—you can adjust all of that later—but you can use the values in the screenshot below as a starting point.

Once you’re satisfied with your Drop Shadow settings, click OK.
5. Create a layer from your drop shadow
Go to Layer > Layer Style > Create Layer to separate your drop shadow from its layer. This will allow you to modify the shadow independent of the object. A warning dialog box might pop up when you go to create the layer; if that’s the case, just click OK.

6. Distort the drop shadow
In your Layers panel, select the newly created drop shadow layer.
Go to Edit > Transform > Distort to pull your drop shadow down to the floor.
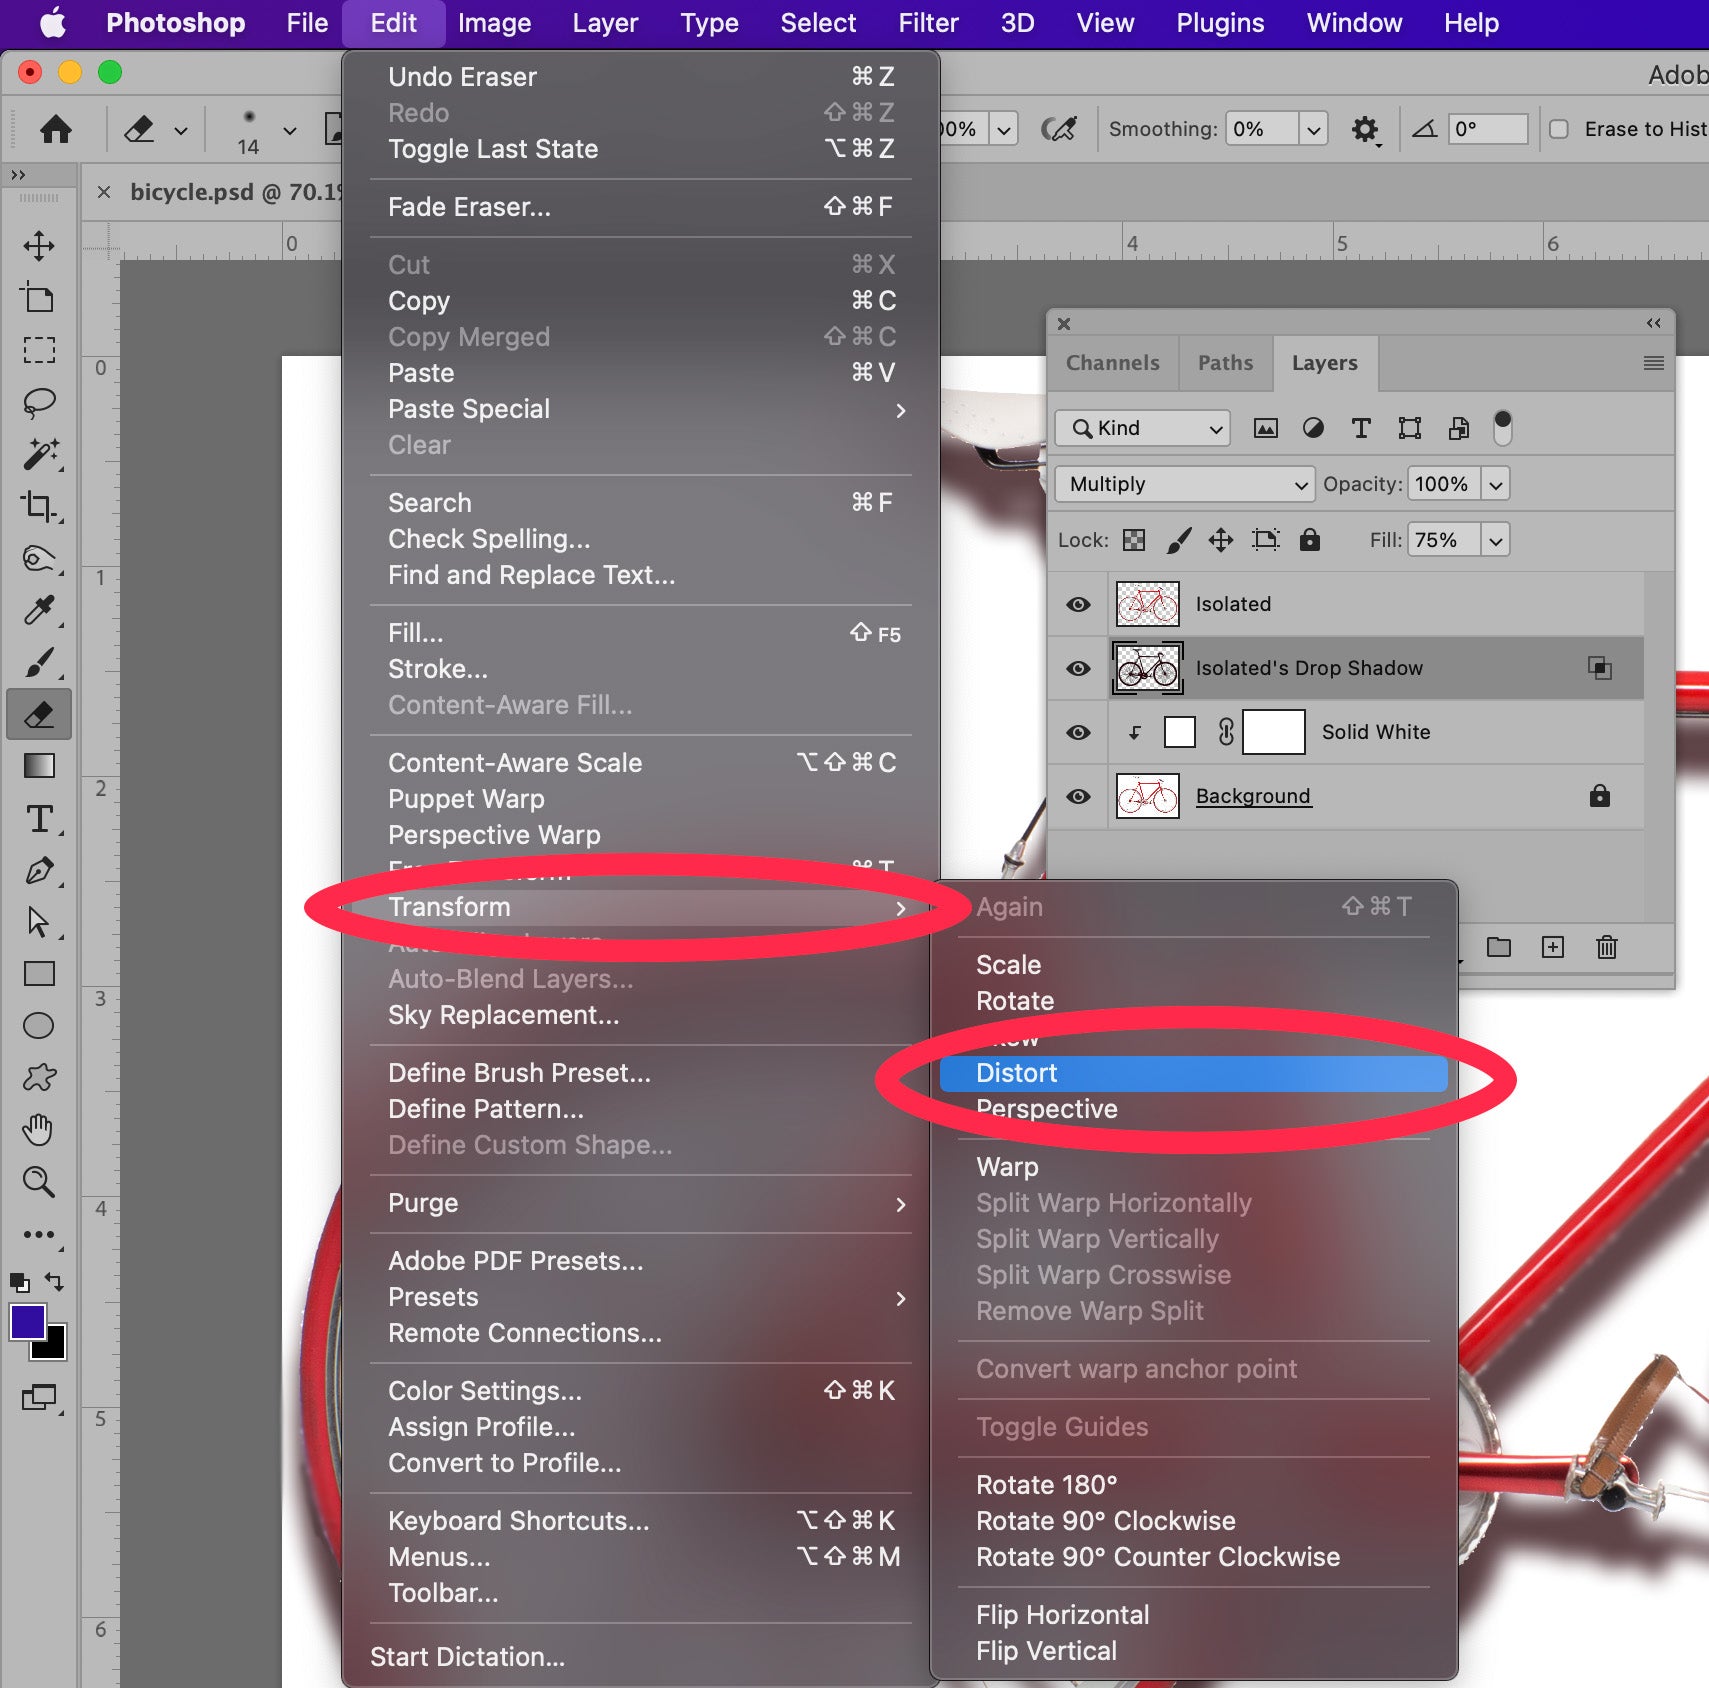
Artistic knowledge comes in handy here—consider where the form shadows are on your object to determine which direction the cast shadow should fall naturally, and think about the vanishing point of your image to determine just how far you should distort the shadow.

7. Create an alpha channel
Our shadow is starting to look realistic, but remember that in real life, shadows become blurrier and lighter the further they get from the object. Using an alpha channel is an easy way to control the areas of the shadow that need to blur and lighten.
To create an alpha channel, go to Window > Channels to open your Channels Panel. Click on the Panel menu to select New Channel.

A New Channel dialog box will pop up. You can keep the name as its default, Alpha 1. Under Color Indicates, make sure the Selected Areas radio button is chosen.

8. Create a gradient within your alpha channel
In your Channels Panel, select your new Alpha 1 channel just as you would select a layer. Make sure the visibility (eye icon to the left of the channel name) is toggled on for all channels.
Select the Gradient Tool from the Toolbar. At the bottom of the Toolbar, make sure the foreground is set to black and the background is set to white.
In the Options Bar at the top of your application window, make sure the gradient is set to black-to-white, and the gradient type is linear.
Once your gradient settings are correct, set your cursor at the furthest point of your shadow (or beyond) and draw the gradient toward the part of the shadow that’s closest to the object.

The selection will be visible as a red gradient overlaying your image.

9. Blur selection
Once you’ve created your gradient in your alpha channel, you’ll see a red gradient on top of your image, indicating how the mask within the channel interacts with your image. You can toggle the eye icon next to Alpha 1 to make the red gradient invisible so it’s not distracting.
Click on the top channel in your Channels panel (either RGB or CMYK, depending on your image’s color mode) to select your color channels and deselect your alpha channel.
Go to your Layers panel to make sure you still have your drop shadow layer selected.
Go to Filter > Blur > Lens Blur. A dialog box will show up giving you significant controls over your blur.
Make sure the box next to Preview is checked. Under Depth Map, select Alpha 1 from the Source dropdown menu.
Keep the Blur Focal Distance at 0, and check the box next to Invert.
Slide the Radius to a high number (in this example, it’s set to 72). Leave all other values at their defaults. Click OK.

10. Create a layer mask
Go to Select > Load Selection. Choose Alpha 1 from the Channel dropdown options and make sure the radio button next to New Selection is checked.

Click OK.
Now you’ll see a selection approximating the darkest areas of the gradient you created in your alpha channel.
Select inverse by going to Select > Select Inverse, or by using the Photoshop keyboard shortcut for the action by typing SHIFT + CONTROL + I (SHIFT + COMMAND + I on a Mac).
In your Layers panel, click on the Layer Mask icon at the bottom of the panel. When the mask is applied, the shadow will appear to “fade” as it recedes into the distance. Notice the thumbnail for the layer mask matches the thumbnail next to Alpha 1.

You should see your shadow recede into the background as it gets “farther” away from the object.
If you’re looking for a subtler shadow, reduce the opacity of your Drop Shadow layer.

11. Consider light source and clean up shadows
Finally, make sure no portions of your shadow appear on the wrong side of your product or object. So, in the example in this tutorial, there should be no instances of the shadow that appear in front of the bicycle since the light source pushes the cast shadow behind it. Using the Eraser Tool, carefully remove shadows that don’t belong.

When to use a natural shadow in ecommerce
There are many reasons and ways to use drop shadows in product photos. When you display a product against a white background, adding a natural shadow helps your product pop against the background and creates a more realistic, professional-looking photo.
Furniture in particular lends itself to the natural drop shadow technique, adding dimension and depth to your product photos without the technical lighting aspects that occur during the shoot. Here’s an example from The Mood Store, where you can see natural shadows added to several images:

Famous Footwear does the same for its main product images, which are uniform in layout, background, and overall aesthetic.

Add natural shadows to bring your product photos to life
Adding natural shadows to each of your images in Photoshop is an important step to editing your product photos for the most sales. But it’s a time-consuming and detailed process—if you don’t have someone from your team dedicated to product photos, it can quickly become a distracting task.
You can outsource your natural shadows, and all your drop shadows, to Path—your virtual photo editing studio ready for you 24/7—so you can spend time on the more important parts of business and life.

Step into the light and let us create shadows for you from 25¢ per image
Learn MoreHow to add a shadow in Photoshop FAQ
How do I add a shadow to an image in Photoshop?
- Isolate your object from the background
- Create a new background behind your isolated object
- Determine your cast shadow color
- Create a drop shadow
- Create a layer from your drop shadow
- Distort the drop shadow
- Create an alpha channel
- Create a gradient within your alpha channel
- Blur selection
- Create a layer mask
- Consider the light source and clean up shadows
What is the easiest way to add a shadow in Photoshop?
The easiest way to add a shadow in Photoshop is to add a Drop Shadow effect to the layer containing your isolated object.
How do you add a subtle shadow in Photoshop?
One of the easiest ways to create a very subtle shadow in Photoshop is to create a small, feathered ellipse of color under your object. This method works well for solid, simple shapes that you want to appear “floating” in a white space with a shadow beneath them.
- Create an ellipse under your object using the ellipse tool. Set the ellipse to be short and wide, about the same width as your object.
- Feather the selection.
- Fill the selection with 50% gray.
- Reduce the opacity of your new shadow.
What is drop shadow in Photoshop?
Drop shadow is a layer effect you can apply to any layer in Photoshop by selecting the layer and choosing Layer > Layer Style > Drop Shadow… from the menu at the top of the application window. While drop shadows can be manipulated into realistic-looking shadows, simple, unaltered drop shadows make the object look flat, as if it were a piece of paper casting a shadow on another piece of paper underneath.